


The Nice Way To Deploy An ML Model Using Docker
A quick guide to deploying an ML model with FastAPI and easily containerizing it within VSCode itself.


There are challenges associated with ML projects when built and run by different developers in a team or otherwise. Sometime, the dependencies may end up mismatching, causing troubles for other dependent libraries in the same project. Besides, you also need to have a clear documentation of every step to take in case you’re providing a project that has to be executed in a specific way.
All of this can be made easier and quicker by using Docker. With containerization, you can save you a lot of time, andhelp smooth out the process of deployment of your app in the long run.
If you’re looking for a guide with a complete set of steps to manually build and run a docker image for your project, you can find it right here, in this article:
How to Dockerize Your Data Science Project — A Quick Guide
How I do it all the time in these simple, easy steps!
However, in this tutorial, I will going over a simpler process to ease out the Docker development, one that can be done entirely with the help of VSCode itself.
Let’s go over each step in building a model, then an API and finally, dockerizing it.👇
Building our ML model
We will be using Spacy for building a simple sentiment classifier which outputs two results for any piece of text passed through to it:
Polarity — it is a float which lies in the range of [-1,1] where 1 means a wholly positive statement and -1 means a wholly negative statement.
Subjectivity — ‘subjective’ sentences generally refer to personal opinion, emotion or judgment whereas ‘objective’ refers to factual information. It is a float which lies in the range of [0,1].
Now, let’s install some packages to start with our development:
pipenv shell # make a new virtual environmentpipenv install pydantic fastapi uvicorn spacy spacytextblob # the packages to installNow, cd into the project and make a new file called “model.py”.
Let’s fill in the code for this file:
import spacyfrom spacytextblob.spacytextblob import SpacyTextBlobfrom pydantic import BaseModel
class SentimentQueryModel(BaseModel):
    text : str
class SentimentModel:
def get_sentiment(self, text): nlp = spacy.load('en_core_web_sm') nlp.add_pipe("spacytextblob") doc = nlp(text) polarity = doc._.polarity subjectivity = doc._.subjectivity return polarity, subjectivityWe are using SentimentQueryModel to contain our only query for this model — the text that we will be predicting the sentiment for, and SentimentModel as the class that loads the spacy tokeniser and the spacytextblob library and performs the sentiment prediction for our given text.
We will now move on to the next step in which build our API.
Making the API
FastAPI is a newer, better way to deploy your machine learning model as a REST API for use in your web apps.
Let’s use our “model.py” in a new file called “main.py” and build a REST API with it:
import uvicornfrom fastapi import FastAPIfrom model import SentimentModel, SentimentQueryModelapp = FastAPI()model = SentimentModel()
@app.post('/predict') def predict(data: SentimentQueryModel): data = data.dict() polarity, subjectivity = model.get_sentiment(data['text']) return { 'polarity': polarity, 'subjectivity': subjectivity }if __name__ == '__main__':
uvicorn.run(app, host='0.0.0.0', port=8000)This API will now run on localhost port 8000, which we will verify by running in the terminal:
python main.pyand you’ll see the output:

If you navigate to localhost:8000/docs, you’ll be able to view and test the API in the browser itself! Isn’t that neat?
But now that we have our model and our API, we can finally move on to making a Docker container out of it!
Containerizing with Docker
Make sure you have the Docker by Microsoft extension installed in your VSCode. Next, go ahead and start up Docker Desktop on your machine.
Now, go into VSCode and type: Command + Shift + P to bring up the command palette. Type “Add Docker files” and you’ll get the option to add a Dockerfile to your project. This process significantly simplifies our entire workflow.
Follow through the instructions and keep the port number as 8080. Don’t forget that port 8000 is used for our API itself so we need a different one for Docker to run on!
Now, simply right click the Dockerfile in the sidebar and select “Build Image”.
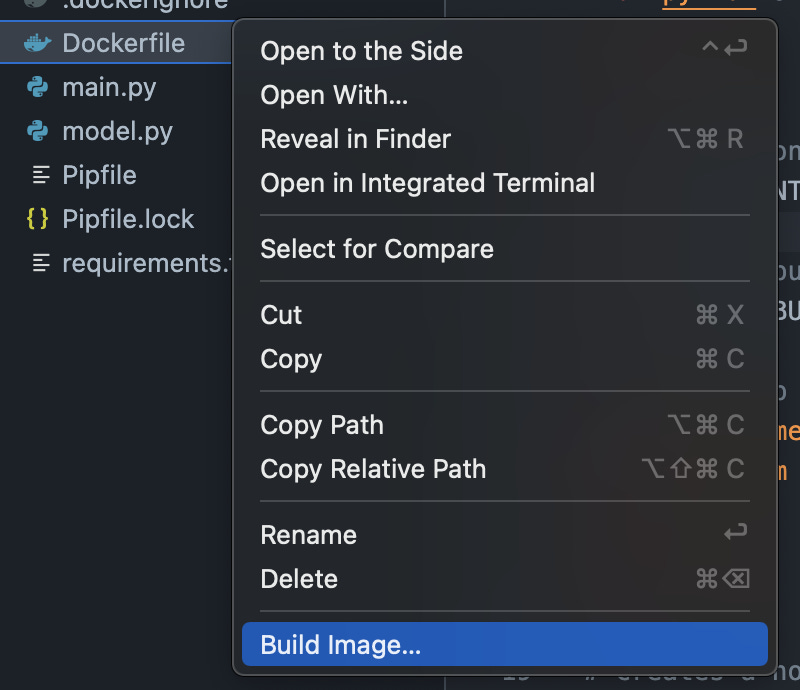
You will begin to see the output in the terminal as the image is being built.
Next, you can go ahead and switch to the Docker tab on your VSCode sidebar.
Here, you’ll see a list of images you already have in your system. The new image we built just now will also show up here like this:

Now you only need to right click the ‘latest’ under the image name and select the Run option.
You can view the startup logs by right clicking the built container and clicking on ‘View logs’ option.
Now, when you navigate to localhost:8000/docs, you’ll see the following screen:
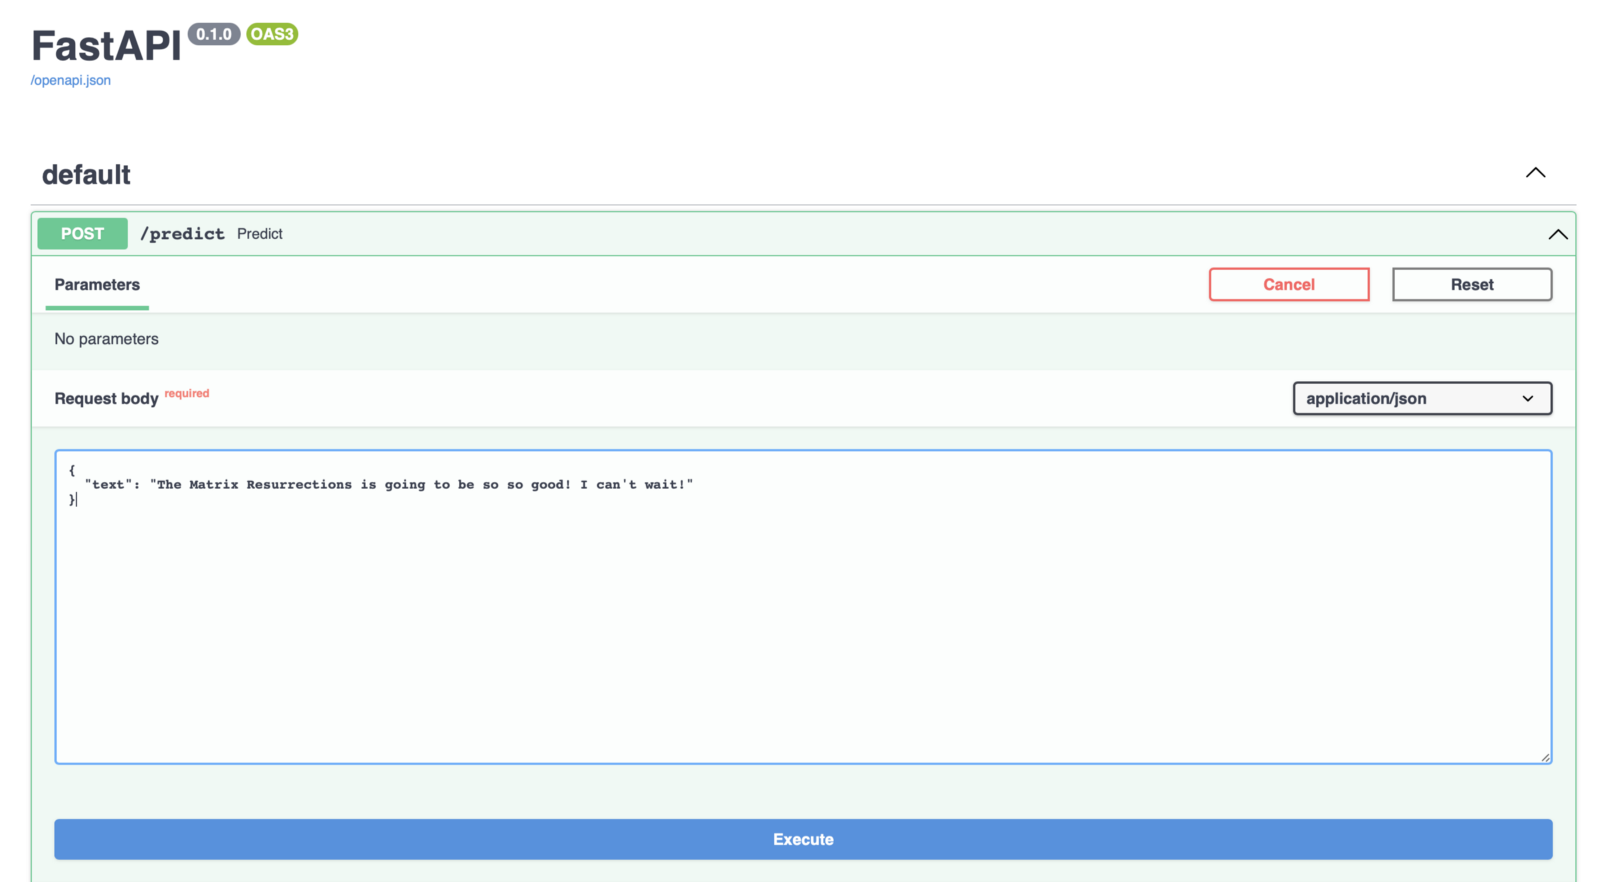
You can simply click on “Execute” which will then produce an output such as:

A few parting words…
So, there you have it — a full pipeline of making an API out of an ML model and containerizing it with Docker!
As you can probably grasp by now, VSCode makes it extremely easy for anyone with minimal knowledge of Docker to quickly spin up their project within a container. I hope this beginner tutorial was helpful in getting you familiar with deploying ML model with Docker.
Get connected with me!
Follow me on Twitter.
Check out the full code repository of all of my Data Science articles!