


A Fast Introduction to FastAI — My Experience
Let me tell you about how I built an image classifier model in less than an hour!

Let me tell you about how I built an image classifier model in less than an hour!

When I first heard about this powerful AI library that everyone seemed to be talking about, I was intrigued. FastAI — as its name stands, boasts to help coders deep dive into the vast and complicated world of deep learning in just a few lines of code and an extremely minimal setup too. Needless to say, I was pretty pumped to get my hands dirty and start experimenting with it a little.
If you’d like to get ahead and see all the code in one go, here’s the GitHub repo I put it all in:
The installation on both Google Colaboratory as well as locally is very simple. It just takes one simple line of pip install fastai in the terminal/code block and you’re done!
Note: Do make sure you’re inside a new virtual environment when you install fastai and open the jupyter notebook to start writing your model! It’ll help a lot in managing the dependencies and later, if you want, you can even package it as a production ready model with just a bit of extra work.
Reading the book which is also provided freely in the convenience of Jupyter Notebooks was a great way to get started; I had already read the first three chapters before I got into writing my own model, utilising a pretty popular dataset from Kaggle for my convolutional neural network based image classification task.
The dataset I wanted to try my hands on was the Rock, Paper, Scissors dataset. It has a reasonable amount of images categorised into three respective folders of train, test and validation which can easily be read by the powerful high level APIs provided by fastai. Believe me, I was pretty surprised to see how easy it was to import data through their DataBlock API — if you’re coming from Keras, from my personal experience, this process feels much simpler than the Keras one.
Let me now get into the mechanics of the steps I went through to make my first model and see for yourself how simple it all is!
The steps to get started
Here’s the data I used for this little project:
https://www.kaggle.com/sanikamal/rock-paper-scissors-dataset
Importing the vision modules from fastai is the first thing I did:
from fastai.vision.all import *The next step was to create something called a ‘Path’ object to indicate where your data is. For example, I wrote it like this:
DATASET_PATH = Path('RockPaperScissors/data')This process is pretty intuitive, you can in fact view your folders of data through the ls function too:
DATASET_PATH.ls()'''Output: [Path('RockPaperScissors/data/valid'),Path('RockPaperScissors/data/.DS_Store'),Path('RockPaperScissors/data/Rock-Paper-Scissors'),Path('RockPaperScissors/data/train'),Path('RockPaperScissors/data/test2')]'''Now we get into supplying the data for our model through the DataBlock API I mentioned earlier.
rps_datablock = DataBlock( blocks = (ImageBlock, CategoryBlock), get_items = get_image_files, splitter = GrandparentSplitter(), get_y = parent_label, batch_tfms=aug_transforms(size=128, min_scale=0.75) )Yes, it is that simple! If your data is arranged into folders like this:
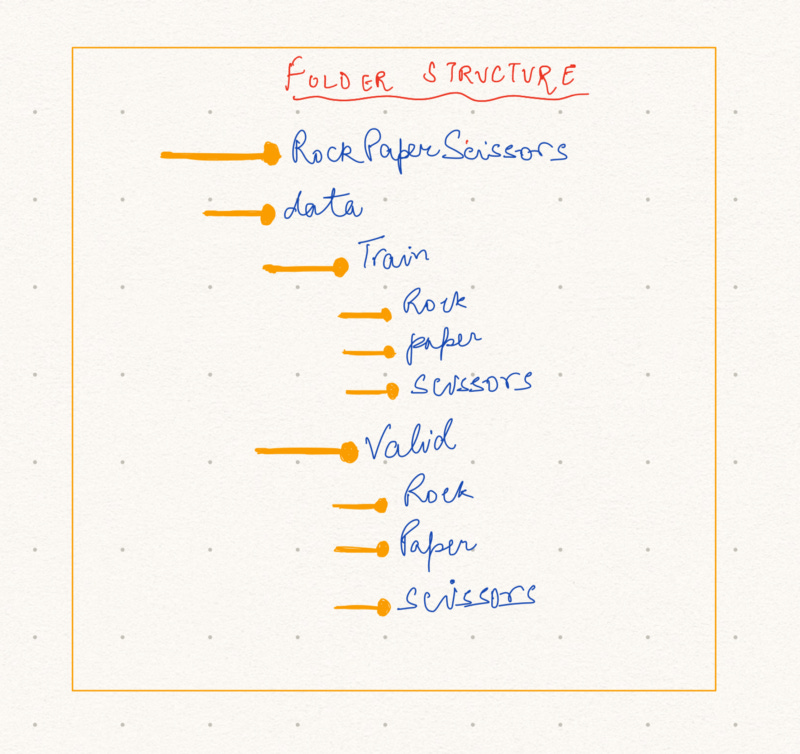
Then importing the images with required labels and train + validation split is all done with just this single block of code!
Breaking it down a little: fastai takes the names of the grandparent folders — the train and valid folders — as the train and validation split for our dataset through the argument ‘splitter’, and parent folders — as the x and y for our dataset, the images being the ‘x’ and the rock, paper, scissors folder names being the ‘y’. And that’s it! Our data is now ready to be consumed by a model. And not only that, the DataBlock API also gives access to a variety of data augmentation functions as well, which I will be exploring in my future articles.
One of the first things Jeremy Howard, the co-founder of fastai, teaches in his book is to use the effectiveness of transfer learning for image classification. If you’re new to the world of ML, don’t worry about it too much. In the book, the introduction to using the power of transfer learning through the large pre-trained models is taught very well, and in simpler, non-mathematical terms too, so it’s really convenient to learn from there instead of many many other online resources) and especially if you are as bad at learning ML math as me :P
Loading a pre-trained model in fastai is even simpler. It looks like this:
learn = cnn_learner(dls, resnet34, metrics=accuracy)Here, as you can see, we’re using the resnet34 pre-trained model for our purposes, and the accuracy after each evaluation on the validation set will be printed for our reference — to see how good or bad our model is performing.
We can also see the model architecture in detail with one simple line:
learn.model'''OUTPUT:Sequential( (0): Sequential( (0): Conv2d(3, 64, kernel_size=(7, 7), stride=(2, 2), padding=(3, 3), bias=False) (1): BatchNorm2d(64, eps=1e-05, momentum=0.1, affine=True, track_running_stats=True) (2): ReLU(inplace=True) (3): MaxPool2d(kernel_size=3, stride=2, padding=1, dilation=1, ceil_mode=False)... and so on.'''Learning can then be initiated with this line:
learn.fit_one_cycle(2)# 2 being the number of epochs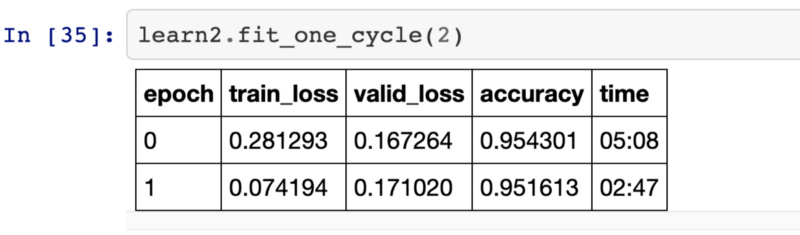
One of the most useful methods of viewing how good your model is performing on the validation set via the Confusion Matrix. This is also very simple to do:
interpret = ClassificationInterpretation.from_learner(learn)interpret.plot_confusion_matrix()This gives the confusion matrix for the three classes of images we have here. There are plenty of methods to customise the appearance of the matrix as well, display useful heatmaps for accuracy, etc.

Concluding…
All of this seemed pretty surreal to me when I first read the chapters and tried to attempt it myself. The power of fastai seems unmatched in the current world of AI — the effortless execution of neural networks in this simple project of mine is a testament to that. In the book, they also explain the in-depth, under-the-hood details of most of the algorithms used very commonly in machine learning, for example, the stochastic gradient descent algorithm and the back propagation algorithm.
As I continue on my journey to explore and learn more, it seems I’ll be doing some very interesting projects in the coming weeks, and if you’re here, after having read all the way through, I’ll encourage you to embark on it with me! I don’t remember the last time I was this excited about learning a new library, one that also encompasses all aspects of deep learning too!
The resources I’ll recommend for you to look up if you’re willing to learn more:
The fastai website and documentation, of course: https://docs.fast.ai
The fastbook delivered to you via jupyter notebooks: https://github.com/fastai/fastbook (I’ll recommend cloning the whole repository on your local machine to access them anytime).
I will be documenting quite frequently about my journey with fastai, so stay tuned if you like. I also publish python and mobile app development focused articles on my own Medium Blog — This Code. Do check it out! 😁